
Hello!
Do you recall the last alert you got on your mobile device while using your favorite apps? Yes, those little messages that pop-up on the screen are known as push notifications. Just like you, millions of users globally receive push notifications every day.
Push notifications are an essential tool for modern applications to engage and retain users. They enable immediate communication with the user, provide them with timely updates, nudge their interaction, and considerably elevate the responsiveness of an application, enriching the user experience and generating enhanced business value.
Azure Notification Hubs provide a highly scalable, cross-platform push notification infrastructure that enables you to either broadcast push notifications to millions of users at once or tailor notifications to individual users.
You can use Azure Notification Hubs to push notifications to mobile devices as well as to desktops. This is the first part of the article series on how to set up push notifications in .NET MAUI using Azure Notification Hubs. In this part, you will learn how to set up Azure Notification Hubs along with Windows Notification Service (WNS) and Firebase Cloud Messaging (FCM) for Android.
I don't have an Apple Developer account to describe how to set up Apple Push Notification Service (APNS) for iOS. But you can follow this guide, provided by Enrico Rossini: MAUI Push Notifications using Azure Notification Hub for iOS
Setting up Azure Notification Hubs
Step 1: Creation of the Notification Hub
Start by creating a new Azure Notification Hub in the Azure portal:
Navigate to the Azure portal.
Click on 'Create a resource'.
In the search box, type 'Notification Hub' and click on it.
Enter all the necessary details and click 'Create'.
Step 2: Configuring the Notification Hub
After creation, configure your newly created Notification Hub:
Go to your Notification Hub and under the 'Settings' section, select 'Access Policies'.
Note down the two connection strings provided.
You'll need these strings when configuring your .NET MAUI project later.
Setting up Windows Notification Service (WNS)
WNS delivers notifications from cloud servers to Windows apps running on Windows 10 and later.
Step 1: Register Your App
Go to the Windows Dev Center's Dashboard, and sign in.
Choose your app from the list of apps.
Click on 'Product identity'.
Find the 'Package SID' value. We will need it later when configuring WNS with Azure.
Click on 'App management' and 'WNS/MPNS'.
Click on App Registration portal. You will be redirected to Azure portal.
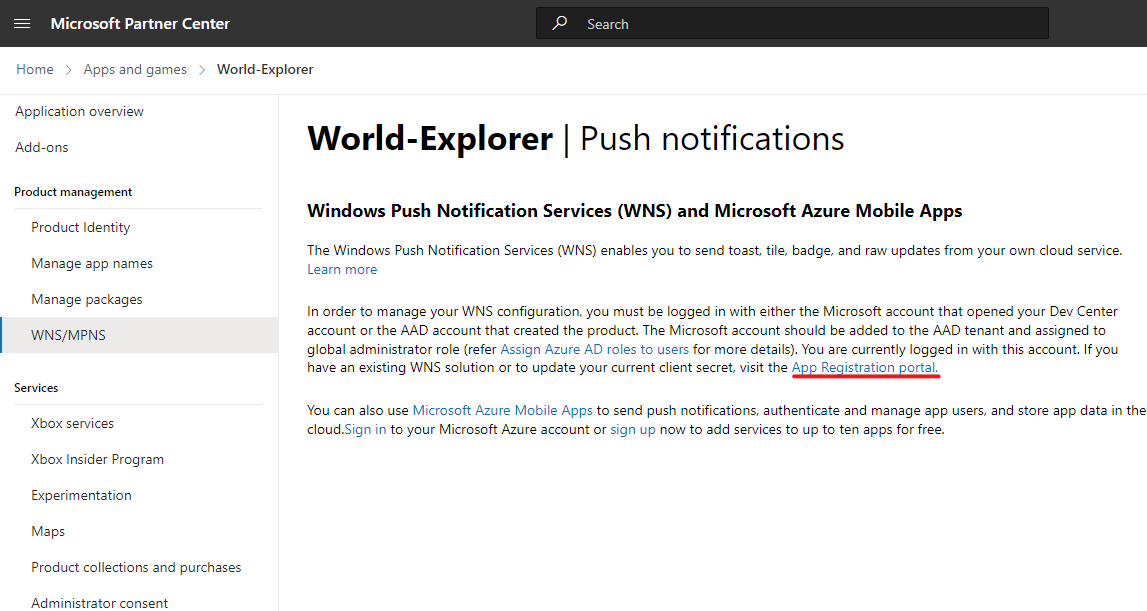
Click on Certificates & secrets
Click on New client secret and create a new secret. Note down the secret value. It is you Security Key. We will need it later when configuring WNS with Azure.
Step 2: Configure WNS with Azure
Go to the Azure portal.
In your Notification Hub, under 'Settings', select 'Windows (WNS)'.
Fill in the 'Package SID' and 'Security Key' details:
Package SID: the value you obtained in the previous step. The format is
ms-app://<Package SID>.Security Key: the value you obtained in the previous step.
Click 'Save'.
Setting up Firebase Cloud Messaging (FCM)
FCM enables you to send push notifications to Android devices.
Step 1: Create a Firebase Project
Go to the Firebase console.
Click on 'Add project'.
Follow the instructions and set up your project.
Step 2: Obtain Server Key
Navigate to 'Project settings'.
Click on the 'Cloud Messaging' tab. Make sure Firebase Cloud Messaging API (V1) is enabled.
Click on the 'Service Accounts' tab and then click on 'Generate new private key'. The JSON file should be downloaded.
Back to Firebase and copy your 'Server key'.
Step 3: Configure FCM with Azure
Go to the Azure portal.
In your Notification Hub, under 'Settings', select 'Google (FCM V1)'.
Fill the fields with the data from the downloaded JSON. !IMPORTANT! If you already had an Azure Notification Hub, you may get an issue "Firebase invalid credentials". To solve it create a new hub.
Click 'Save'.
That's it! You now have Azure Notification Hubs integrated with both FCM and WNS.
As a next step, don't forget to start setting up your .NET MAUI project. You can find out how to do that in the second part of this article series. Here is the link to the second part.