.NET MAUI Push Notifications using Azure Notification Hub. Part 2. Setup .NET MAUI

.NET MAUI Push Notifications using Azure Notification Hub. Part 2. Setup .NET MAUI

15 August 2023

.NET MAUI/Xamarin

Buy Me A Coffee

Hello again,

In the previous article, you learned about the importance of push notifications and how to set up the Azure Notification Hub together with Windows Notification Service (WNS) and Firebase Cloud Messaging (FCM). Are you ready to take the next step? Good! Because now we're going to dive into the fantastic world of .NET MAUI and see how you can use this cross-platform framework to configure your application for receiving these push notifications. By the end, you'll be able to create an application that can accept and action on these messages, providing your users with timely updates and proactive communication. Let's dive straight in!

I don't have an Apple Developer account to describe how to set up Apple Push Notification Service (APNS) for iOS. But you can follow this guide, provided by Enrico Rossini: MAUI Push Notifications using Azure Notification Hub for iOS

Setting up your .NET MAUI Project

Android

Step 1: Add google-services.json

Open Firebase Console and select Add Firebase to your Android app.

Android Firebase registration

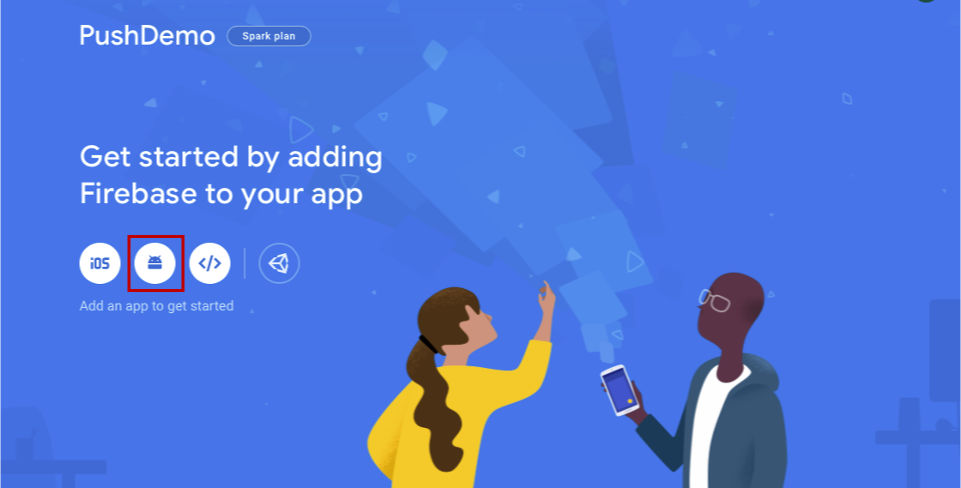
On the Add Firebase to your Android app page, enter an Android package name. It should match the package name of your .NET MAUI application.

Select Register app.

Select Download google-services.json. Then save the file into a Platforms\Android folder.

Step 2: Add Required Packages

<ItemGroup Condition="'$(TargetFramework)' == '$(NetVersion)-android'">
    <GoogleServicesJson Include="Platforms\Android\google-services.json" />
    <PackageReference Include="Xamarin.Firebase.Messaging" Version="122.0.0" />
    <PackageReference Include="Xamarin.Google.Dagger" Version="2.39.1" />
</ItemGroup>

Step 3: Add permissions

Update AndroidManifest.xml:

<uses-permission android:name="com.google.android.c2dm.permission.RECEIVE" />
<uses-permission android:name="android.permission.WAKE_LOCK" />
<uses-permission android:name="android.permission.GET_ACCOUNTS" />

Step 4: Update MainActivity.cs

Remember the connection strings from the Azure Notification Hub setup? You'll need them now.

Search for DefaultListenSharedAccessSignature access policy and copy SharedAccessKey.

protected override async void OnCreate(Bundle? savedInstanceState)
{
    base.OnCreate(savedInstanceState);
    await DeviceInstallationService.RegisterDevice("YOUR HUB NAME", "YOUR SharedAccessKey");
}

Don't use DefaultFullSharedAccessSignature in client applications!

Step 5: Create DeviceInstallationService.cs

Azure Hotification Hub requires device registration, so it knows what device should receive a notification.

public static class DeviceInstallationService
{
	private static bool NotificationsSupported
		=> GoogleApiAvailability.Instance.IsGooglePlayServicesAvailable(Application.Context) == ConnectionResult.Success;

	private static string? GetDeviceId()
		=> Settings.Secure.GetString(Application.Context.ContentResolver, Settings.Secure.AndroidId);

	public static async Task RegisterDevice(string notificationHub, string key)
	{
		if (!NotificationsSupported)
		{
			return;
		}

		var firebaseToken = await FirebaseMessaging.Instance.GetToken();
		var deviceInstallation = new
		{
			InstallationId = GetDeviceId(),
			Platform = "gcm",
			PushChannel = firebaseToken.ToString()
		};
		using var httpClient = new HttpClient();
		httpClient.DefaultRequestHeaders.Add("x-ms-version", "2015-01");
		httpClient.DefaultRequestHeaders.TryAddWithoutValidation("Authorization",
														   CreateToken($"https://{notificationHub}.servicebus.windows.net",
																	   "DefaultListenSharedAccessSignature",
																	   key));
		await httpClient.PutAsJsonAsync($"https://{notificationHub}.servicebus.windows.net/{notificationHub}/installations/{deviceInstallation.InstallationId}?api-version=2015-01", deviceInstallation);
	}

	private static string CreateToken(string resourceUri, string keyName, string key)
	{
		var sinceEpoch = DateTime.UtcNow - DateTime.UnixEpoch;
		var week = 60 * 60 * 24 * 7;
		var expiry = Convert.ToString((int)sinceEpoch.TotalSeconds + week);
		var stringToSign = HttpUtility.UrlEncode(resourceUri) + "\n" + expiry;
		using var hmac = new HMACSHA256(Encoding.UTF8.GetBytes(key));
		var signature = Convert.ToBase64String(hmac.ComputeHash(Encoding.UTF8.GetBytes(stringToSign)));
		var sasToken = string.Format(CultureInfo.InvariantCulture,
									 "SharedAccessSignature sr={0}&sig={1}&se={2}&skn={3}",
									 HttpUtility.UrlEncode(resourceUri), HttpUtility.UrlEncode(signature), expiry,
									 keyName);
		return sasToken;
	}
}

Here we use FirebaseInstanceId.Instance.Token to get the token and then we send a PUT HTTP Request to register our device with NotificationHub. You can find more details here: Notification Hubs REST API Methods.

Now your device is registered.

Step 6: Setting up the Receivers

The last step is to define our receiver.

You need to set up receivers to handle notifications pushed to your app.

For Android, use FirebaseMessagingService. Override OnMessageReceived() to define how the notifications should be handled:

[Service(Exported = false)]
[IntentFilter(new[] { "com.google.firebase.MESSAGING_EVENT" })]
public class PushNotificationFirebaseMessagingService : FirebaseMessagingService
{
	public override void OnMessageReceived(RemoteMessage p0)
	{
		base.OnMessageReceived(p0);

        var receivedNotification = p0.GetNotification();
        // implement your logic here...
	}
}

Windows

Windows doesn't require any additional packages. We only need to register our device.

Step 1: Registering for Push Notifications

In your Platforms/Windows/App.xaml.cs handle the startup logic to register for push notifications. For Windows, use PushNotificationChannelManager.CreatePushNotificationChannelForApplicationAsync() to create a channel and register it with NotificationHub:

private async Task RegisterDevice(string notificationHub, string key)
	{
		var channel = await PushNotificationChannelManager.CreatePushNotificationChannelForApplicationAsync();
		channel.PushNotificationReceived += Channel_PushNotificationReceived;
		var deviceInstallation = new
		{
			InstallationId = new EasClientDeviceInformation().Id,
			Platform = "wns",
			PushChannel = channel.Uri
		};
		using var httpClient = new HttpClient();
		httpClient.DefaultRequestHeaders.Add("x-ms-version", "2015-01");
		httpClient.DefaultRequestHeaders.TryAddWithoutValidation("Authorization",
																 CreateToken($"https://{notificationHub}.servicebus.windows.net",
																			 "DefaultListenSharedAccessSignature",
																			 key));
		await httpClient.PutAsJsonAsync($"https://{notificationHub}.servicebus.windows.net/{notificationHub}/installations/{deviceInstallation.InstallationId}?api-version=2015-01", deviceInstallation);
	}

	private void Channel_PushNotificationReceived(PushNotificationChannel sender, PushNotificationReceivedEventArgs args)
	{
        var notification = args.RawNotification;
		// implement your logic here...
	}

	protected override async void OnLaunched(LaunchActivatedEventArgs args)
	{
		base.OnLaunched(args);
		await RegisterDevice("YOUR HUB NAME", "YOUR SharedAccessKey");
	}

	private static string CreateToken(string resourceUri, string keyName, string key)
	{
		var sinceEpoch = DateTime.UtcNow - DateTime.UnixEpoch;
		var week = 60 * 60 * 24 * 7;
		var expiry = Convert.ToString((int)sinceEpoch.TotalSeconds + week);
		var stringToSign = HttpUtility.UrlEncode(resourceUri) + "\n" + expiry;
		using var hmac = new HMACSHA256(Encoding.UTF8.GetBytes(key));
		var signature = Convert.ToBase64String(hmac.ComputeHash(Encoding.UTF8.GetBytes(stringToSign)));
		var sasToken = string.Format(CultureInfo.InvariantCulture,
									 "SharedAccessSignature sr={0}&sig={1}&se={2}&skn={3}",
									 HttpUtility.UrlEncode(resourceUri), HttpUtility.UrlEncode(signature), expiry,
									 keyName);
		return sasToken;
	}

Sending Push Notifications

You can send push notifications directly from Azure portal:

  1. Go to your Notification Hub in Azure portal.
  2. Choose ‘Test Send’ under ‘Support + troubleshooting’.
  3. Select your platform and write your notification.
  4. Click on ‘Send’.

You've now successfully implemented push notifications in your .NET MAUI application using Azure Notification Hubs, FCM, and WNS. Test it out and see how it greatly enhances the interactivity of your cross-platform app.

Don't miss the first part of this article series if you haven't got your Azure Notification Hubs, Windows Notification Service (WNS), and Firebase Cloud Messaging (FCM) setup yet.

Click here for the GitHub repository with the full code for this .NET MAUI push notifications implementation.

Buy Me A Coffee

Related:

Drawing View in Xamarin Community Toolkit

The SignaturePad successor is now available in XCT. This article describes how to add it to your project.

Replicate a bank application UI using .NET MAUI

Replicate the Ukrainian Monobank application UI using .NET MAUI.

An unhandled error has occurred. Reload

🗙